Introduction
Hey friends! Today, we'd like to explore a topic that I think has lately of becoming somewhat ubiquitous in the electronic music world. In recent years, modular synths have been making a resurgence across new music releases, influencer content, and YouTube videos. Modular synths can be found across the Internet these days, and it's easy to find yourself asking "Well I'm a complex electronic music producer. Do I need a modular synth setup of my own?" And these questions may arise without the understanding that the core functionality within Ableton Live itself allows musicians to work in a similar way, with the routing and interconnectivity of different devices being as important as the individual devices being used. This principle is only enhanced and augmented by the powerful functionality of Max for Live, included with Ableton Live's Suite edition.
Thinking Modular With Wavetable
In reality, Ableton Live itself is a modular synthesizer even before we get into the Max for Live portion of today's lesson. A great way to demonstrate this concept uses Live's Wavetable synth. The core idea of modular synthesis is that from oscillators to envelopes to LFOs - elements of modular synthesis can freely interact and control one another. You could take any modulation signal and send it to any modulation destination in a system of elements. Modulation signals can be sent freely and connect to many other modulation destinations to create a sound that is cumulative and richly layered with cohesive movement. An excellent tool to use as a visual aid for this idea is the modulation matrix inside Live's Wavetable.
If you're interested in learning more about Wavetable check out our tips and tricks style video with Ableton Wavetable. Not only is Wavetable pretty awesome in and of itself, but in this case, it's a great way to demonstrate how Live uses its individual components to add depth and complexity to a complete whole, much as a great modular synth does.
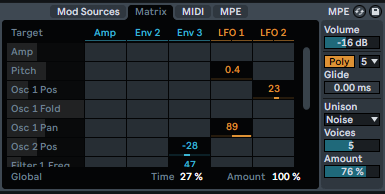
Wavetable's Modulation Matrix shows the connections between sources and targets of modulation. Mod sources laid out horizontally across the top of the table include the 3 envelopes and 2 low-frequency oscillators (LFOs) available within Wavetable's interface. These modulation sources can be pointed to any destination listed on the left side of the table. This is more than a binary 'off/on' selection, the degree to which the destination is affected can be specified numerically as well in order to allow for fine control over the intensity of the applied modulation. In this example screenshot, LFO1 is affecting the synth's pitch by a very small amount (0.4), but applying a much greater level of modulation to the panning of Oscillator 1 (89). Beyond this, we can see that Envelope 3 is applying an inverse or negative value (-28) to the position of Oscillator 2. Since a Position value can be either forward or backward in the series of waveforms, this negative value indicates that Oscillator 2's position is modulated backward from its starting point by Envelope 3.
So what does this example tell us conceptually about modular synthesis at large? In the grand scheme of things, modular synthesis allows for device parameters to be controlled by modulation sources. Two of the most important and common forms of modulation sources are ADSR envelopes and LFOs.
Modulating Anything in Ableton Live
The biggest limitation of Wavetable's modulation matrix is that it only has access to the parameters contained within a given instance of Wavetable. The matrix cannot reach outward from Wavetable to other audio and MIDI effects in the same channel. In traditional modular synthesis, It is the idea that modulation sources are shared in common and used for multiple changes to the same sound that these changes sound cohesive and work in tandem to add satisfying depth to a sound. Thankfully, Live provides users with two very powerful Max for Live devices which allow parameters in different devices to share common modulation sources.
Envelope MIDI
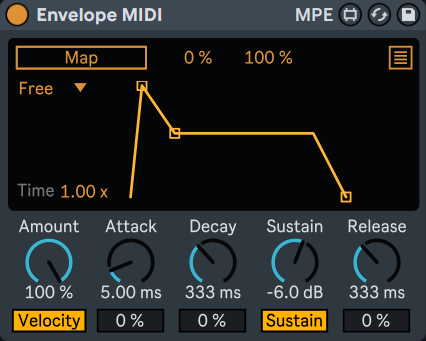
The first of these devices is called Envelope MIDI. The Envelope MIDI device works by using incoming MIDI notes to trigger an envelope. While on the surface, this may not sound like the most exciting feature; tying instrument parameters, audio effects and even other MIDI effects to a common modulation source can allow for the creation of very rich, nuanced sounds.
MIDI Envelope has a very simple interface containing ADSR controls to define the Attack, Decay, Sustain, and Release of the envelope, an Amount knob to control the global amount of modulation sent to all mapped parameters, and a Map button. By simply clicking the Map button and then clicking a desired parameter elsewhere in the signal chain to apply the MIDI envelope to up to 8 different parameters. The Envelope MIDI device is a great way of adding additional complexity to an existing sound. The possibilities here are truly endless since MIDI Envelope can tap into the parameters of not just the instrument, but other effects and even MIDI devices in the signal chain. And because these various parameters are being changed by common modulation, it is easy to make all of this modulation sound cohesive, as various elements of the sound move together in harmony.
The LFO Device
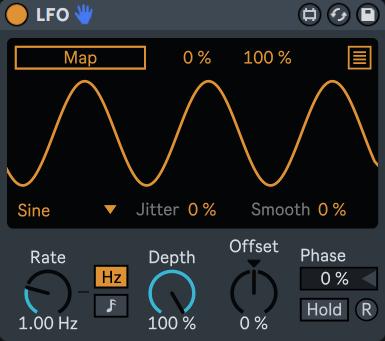
The second device for adding modular depth within Live is called LFO. Like Envelope, LFO's simple, direct name leaves nothing to guess in its intended functionality. The LFO device provides a feature-rich low-frequency oscillator that is capable of modulating any parameter within a chain. LFO is capable of a large range of speeds both free-running and synced with Live's clock, as well as depth, offset, and phase controls to further fine-tune the position, intensity, and shape of the LFO's core movement. Beyond this, the mapping list provides even more finite control over the minimum and maximum levels of the LFO sent to individual modulation destinations. Understanding the level of freedom and control this gives us is really big. By utilizing LFO and Envelope to expand on the common modulation in our sound design, we've effectively expanded our abilities with all of the mappable devices in our DAW.
It's no coincidence that the two devices used in today's lesson perform the same basic functions that can be found on board nearly all hardware and software synths - LFOs and envelopes are the most common and primary ways that we modulate sound in a digital space. Again, what separates these Max for Live devices from the instances found within hardware and software instruments are their ability to reach beyond the contained parameters of that device. Envelope and LFO both have the capacity to create changes in the core instrument simultaneously with synchronized changes in that instrument's effects; which can lead to a tremendous amount of depth and nuance in our sound design.
Recording Modulation
So what is a real, practical application of these devices? It's easy to pile on a bunch of modulation to our sound but how can we turn these modulation experiments into usable musical parts? By recording this automation in arrangement view we're able to capture the outputs of our modulated audio as new audio tracks. Committing this modulation to audio allows us to resample the most sonically interesting nuggets and segments in the recording. This way we're simultaneously able to be very deliberate with the modulation we include in the finished product while being free to experiment with modulation to generate lots of unique versions of the audio. Furthermore, once we've committed our modulation to audio, we're able to free up additional system resources by working with audio clips rather than raw MIDI that is being modulated in real-time during playback. Not to mention the whole new world of editing and processing techniques that open up to us working with audio on the arrangement timeline.