Hey friends! In today's lesson, we're going to showcase 3 methods for using Ableton Live to create generative and random glitch effects. These techniques allow us to use proprietary effects and functionality in Ableton to easily and quickly create interesting drum patterns, one-of-a-kind fills, and unique rhythms. The coolest part of these workflows is that we're leveraging the tools that Live gives us to generate as many of these sounds as we like! Instead of tediously crafting one sound at a time from scratch, we're simply picking out the best of these generated sounds to incorporate into our music. Each of these techniques is a simple, quick, and repeatable way of adding all kinds of awesome glitchy sounds to our drums.
Method 1: Gated Beat Repeat with Effects
Our first method is one that we consider to be Anthony / Earthcry's own signature way of producing generative drums. Using this method we can use any drum loop as a solid starting point. The core idea can be used on just about any effect chain too; making the sonic possibilities here virtually endless. Let's start by dragging a Beat Repeat into our drums channel from Live's browser. Beat Repeat is available in all versions of Ableton Live, so this is a technique available to all Live users.
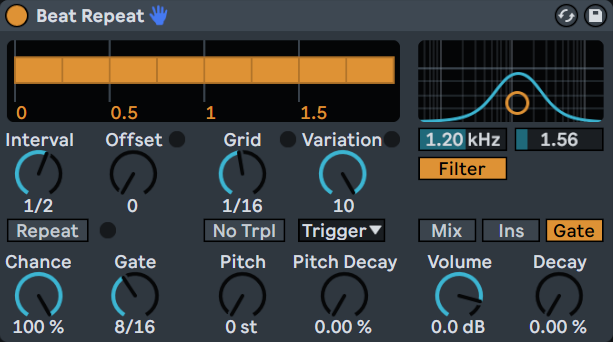
Beat Repeat is set to "Mix" mode by default. This means that the beat repeat is playing over top of the original drum loop - mixing in with the dry signal. What we want is to switch Beat Repeat's output mode to "Gate". While in Gate mode, Beat Repeat will only produce sound when it's creating a glitch or making a repeat. Next, make sure that the Chance knob is turned up to 100% so that Beat Repeat is used consistently. After that, make sure that Variation is also turned all the way up to 10. The variation setting affects the changes in the grid size of each repetition, meaning that the sound that the sounds that Beat Repeat produces will be randomized with each iteration.
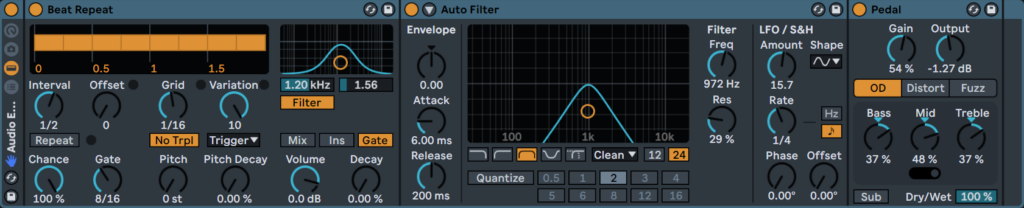
A lone Beat Repeat doesn't sound like the most impressive thing on its own in most situations. However, now that we've isolated the sounds from the Beat Repeat, we're able to develop that signal chain into something a bit more sonically interesting using a group of effects that starts with our original beat repeat. Experiment with some audio effects placed after the beat repeat, and consolidate them into a group by selecting all of them and using Ctrl/Cmd + G.
In this example of a Beat Repeat effect rack, we've added an AutoFilter and Pedal to give the glitches a bit of movement and overdrive and make these edits sonically distinct from our starting point.
Now that we have a more developed effects chain and we've isolated the glitchy sounds from our original loop, we can route the modified audio to its own audio track. Simply create a new audio track and set that track's input to record the output of the track containing the Beat Repeat using the "Audio From" dropdown menu. Now, we're able to record the beat repeat and any other effects to their own audio channel while leaving our original drum loop intact.
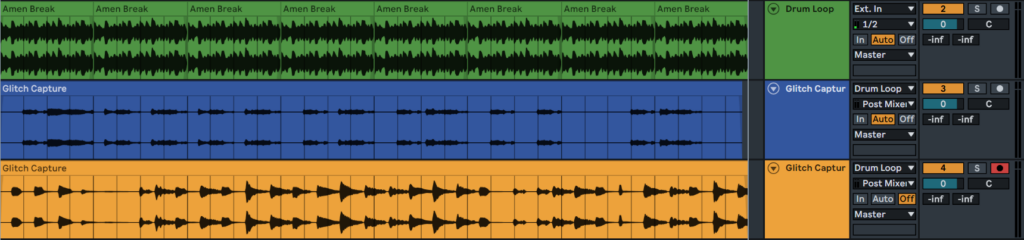
Next let's go to Arrangement view and duplicate our original drum loop a few times and capture some instances of the glitches. Arm the audio track receiving the glitched audio and record as many iterations as you like to start. In the below screenshot, we recorded 8 bars of our original (Drum Loop) to a new audio channel called "Glitch Capture".

So now we have produced 8 bars of glitchy sounds that are made from our original drums. These sounds will often fit together nicely with our starting point because they're inherently related. Even with additional effects in place, the modified drums still share a lot in common sonically with the unmodified original. Better still, these new glitchy sounds are recorded synced to the clock. Because the modified drums share tonality and the same grid as the originals, it's a breeze to browse through our newly created sounds to pick out the best parts and edit them together with our starting point.
Making More Iterations
Let's repeat this process a few times to give ourselves more material to work with. Start by returning to our glitch rack on the original drums. We can save our original Beat Repeat rack to use again later. Double-click the title of the effect rack to close it, and toggle off the rack's yellow power button to bypass it. Now we can begin the process of building a new rack while having the previous one set aside to use later if we like.
Start exactly like last time - drop in a new instance of Beat Repeat by dragging it in from Live's browser. Again, be sure to turn up the knobs for Chance and Variation to create more variations. Once we've tweaked the settings in Beat Repeat to our liking, we can add additional effects after Beat Repeat to develop a unique-sounding effect chain which we will group into an Effect Rack.
In our next example of a Beat Repeat audio effect rack, we have Beat Repeat utilizing it's Decay feature. The Decay setting causes the volume of the glitches to change over time. Next in line, we have a Phaser-Flanger adding a little movement with a Utility following to clamp down on the overall width of the signal. After, we have Redux distorting the signal with an LFO modulating the Redux's Shape Setting.

Lets repeat the recording process and record this set of glitches to their own audio track. Create a new audio track and set the audio input to the new instance of our beat repeat rack. Then simply arm the new audio track and record a new set of glitches.
In our video, we repeat this process a third time to add another instance of unique sounds using a third effects rack. This time we used Beat Repeat with Gate enabled to feed into Corpus and Erosion, to create a distorted, crunchy, low-fidelity version of our glitches to the mix. Just like the previous rack, instead of deleting the previous one, we simply toggled off the power button and closed the rack by double-clicking it. Setting aside these racks means that if we want to generate more from a given rack, it's as simple as toggling the rack back on and recording a new track of glitches without having to rebuild anything.

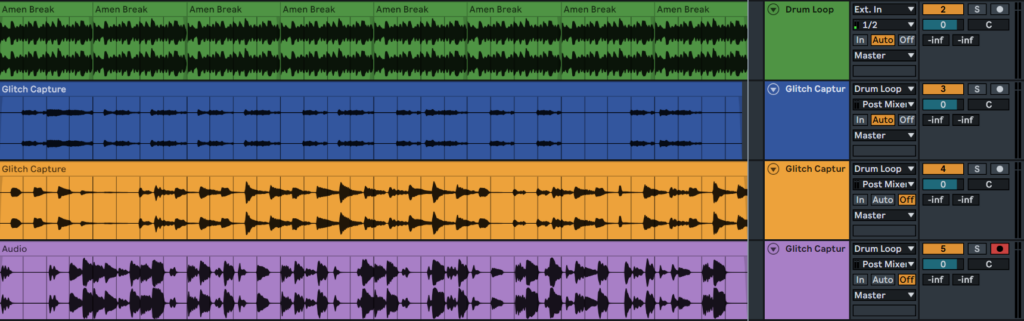
The core of the workflow stays the same no matter what chain of effects we decide to build. Using Beat Repeat's Gate feature and Variation we send the isolated glitches/repeats through an effect chain to generate unique snippets of audio and record them into separate audio tracks. Then, create a new audio track and set its input to receive the output of our rack just like last time. Then record a new set of glitches to add to our palette of unique generated sounds. Now we've got our dry, original drum loop as well as three separate tracks containing unique, generated glitch sounds which are sonically related to our original loop, giving us a large palette of sounds to work into our arrangement.
Working Glitch Effects Into Your Arrangement
One of the things that makes this method so powerful is that all of these glitchy iterations are synced to the clock, so the process of moving them around and using them in conjunction with our dry drum sounds is very straightforward. Start by dragging the generated glitches over or inserting some silence with Crtl/Cmd + I to give yourself some blank space to work with under your original, dry drums.
Now, one at a time we can listen through each of our glitchy recordings in order to pick out the most interesting and appealing pieces of each version. Be sure that Live's automation is toggled off for this stage so that we don't accidentally grab automation instead of clips when we're moving parts around.
When you find a snippet that you'd like to use, simply highlight that section and drag it back to the part of the arrangement containing your original drums. Experiment with placing these snippets and find places to incorporate them. Listen through each of your glitch tracks and populate the original drums with these additional edits. Sometimes, the edits will sound fine when playing with the original audio while other times may call for cutting away from the original drums to let the glitches take the spotlight.
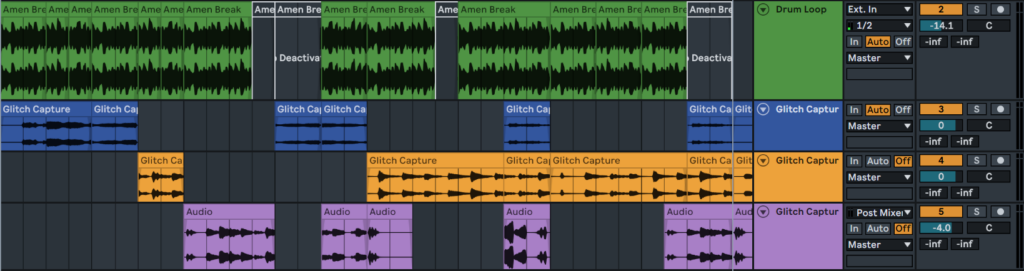
As you move around more and more segments of audio, things can get a little messy. You may find that it helps you to stay organized to take a moment to name your snippets of audio to make them easier to identify at a glance.
Sidechaining the Glitches with a Shared Bus
Next, let's work on developing a more cohesive sound to our glitches so that they work together a little better and sit together better with our original drum loop. We'll accomplish this by grouping together our glitch tracks into a shared bus and working with them all together. Start by selecting your first glitch track, hold Shift and click the last glitch track and press Ctrl/Cmd + G to group them together.
When we group tracks together, we create a shared channel or bus which will cascade any edits or effects into each of the group's contained tracks. One important thing we can do that will instantly solidify our drums together is to sidechain them with our original drum loop. Sidechaining will ensure that none of the glitch effects are overpowering the most important elements of our original drum loop. Namely our kick and snare. Proper sidechaining will ensure that the glitches will duck out of the way of these important transients.
Simple sidechain compression is quick and painless. Just drag in an instance of Compressor from Live's browser. Then, just turn on the Sidechain mode and set the Audio From dropdown to your original drum loop. Make sure that the ratio is turned all the way up so that the Compressor activates instantly when it's needed. Now, when we play the drum loop together with our glitchy sections, the glitches aren't muddying up the kick and snare. More important, now we're not overpowering the Master channel when the kick or snare fire at the same time as a louder segment of a glitch.
Method 2: Legato Trigger Follow Actions
Now the second method is originally based on an incredible video from Ned Rush who was using Follow Actions to allow Ableton to generate all kinds of amazing glitch effects. If you want to watch the original method in more explicit detail, you should definitely check out this awesome video by Ned Rush. We consider our way to be the kind of 'quick and dirty' version of Ned's video - meant to get you up and running quickly with this cool workflow.
Let's grab some drums and head over to Live's Session View. Don't worry, we'll still be using Arrangement view to record our output in a similar way to method 1 of this lesson. Using Session View to record your output to Arrangement View is an awesome way of testing out new ideas at any time. This way of working will help us to produce tons of unique drum parts easily. The theme with all three of these workflows is that we're leveraging the software to create a bunch of iterations for us and allowing us to play the role of the selector to pick the parts that we enjoy.
Clip Launching: Follow Actions and Legato
At the core of this workflow, we'll be breaking our starting drum loops down into individually edited parts and fragments which will jump randomly to other edited segments using follow actions. Using this method simultaneously gives us a lot of finite control over our individual edited clips while creating a high amount of randomization between the segments with follow actions.
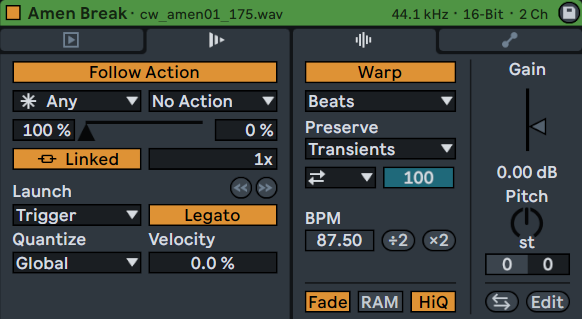
To begin, let's ensure that our initial drums sample has looping and the Legato option both toggled on in the clip settings. After selecting the clip, click on the follow action clip tab, which looks like a striped play button under the clip's name. Let's also toggle on Follow Actions, and set the Follow Action type to Any or Other. Setting our Follow Actions this way means that at the end of a clip, the next clip played will be randomly selected. As we create edits, we will be duplicating our starting drum clip as we go to make sure that these clip-level settings stay intact with each newly created clip. Any clip can be duplicated in session view by clicking and dragging while holding Ctrl / Cmd. Once the initial settings are dialed in on our template clip, duplicating it will save us a lot of time not having to set up each individual edit the same way each and every time we create one.
Follow Action Boundaries

Another important concept to understand about Follow Actions is that they work within blocks of clips that are grouped together in Session View. When using the Follow Actions "Any" or "Other", the blank slots where no clip exists will act as the boundary for a block of clips sharing a set of follow actions. In this example screenshot, Edits 1-5 could potentially be played after one another using the Any or Other type follow actions. However, Edit 6 will never be randomly selected to follow one of those clips, since a blank clip slot exists between Edit 5 and 6.
These boundaries for follow actions are useful for a number of reasons. First, this functionality allows us to create different groups of edits within the same Live set. Launching one scene can start the randomized playback of one set of edits that are separate and independent from another set of edits. But for the purpose of editing, these boundaries also allow us to loop a single clip while it's being edited without having to deal with randomized playback or toggling a clip's follow actions on and off repeatedly. If we were to play Edit 6 in the screenshot, we would never jump back into the block of edits, even if our duplicated clip is instantiated with the Any or Other follow actions enabled. Understanding follow action boundaries and utilizing duplicated clips properly allows us to create lots and lots of edited clips quickly and easily.
Creating Edits with Clip-Level Settings
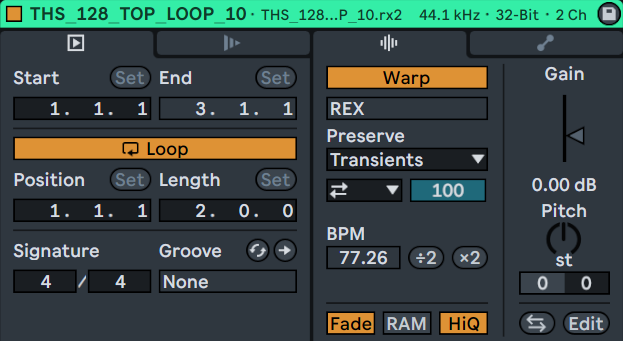
If we think outside the box a bit, Live allows us to use the settings associated with an audio clip to create all kinds of interesting audio effects and gives us a powerful new set of tools for experimenting with our sound and composition. A clip's main settings can be found using the tab to the left of the following actions tab under the title bar of the clip. In the clip settings tab, we can use the clip length and starting position settings in conjunction with a clip's warping modes, preservation options, pitch, and other options to create all sorts of variants and fragments of the original clip. When we start to mix up these individually tweaked clips using randomized follow actions, the sky is really the limit with the number of sounds we can generate this way.
Try editing some clips to last only a beat or two. Try editing some clips to last only for an individual hit. These shorter clips will mix up the feel of our rhythm by re-contextualizing the other sounds in the beat each time they trigger.
Randomized Clips with Automation
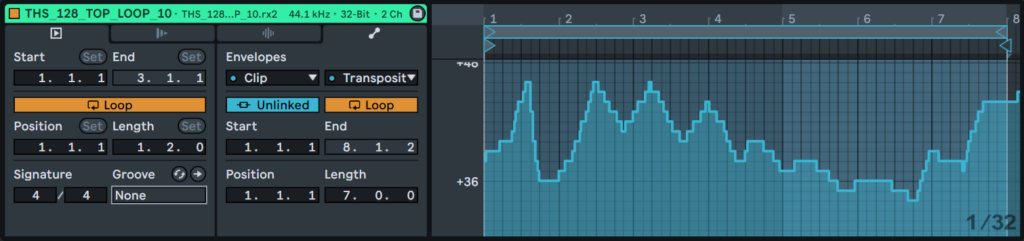
Another cool trick for adding more variations and intricacy to our clips is to create clip-level automation and unlink the automation's envelope from the clip playback. This allows the envelope to operate independently of the clip playback. Meaning that this is yet another layer of randomization that will play out slightly differently each time the clip is active. The above screenshot is a clip that is 1.5 bars long but contains clip automation for the pitch that lasts 7 bars. So each time that the clip plays, the envelope for the pitch will have a different starting point along the envelope - leading to a lot of variations and unpredictability within a single clip. We can get access to even more options for clip envelopes if we start adding effects to the channel as well. If you're interested in this workflow, make sure to go check out Ned Rush's video because Ned goes into great depth exploring the sound design potential of working with clip follow actions like this.
Recording Session View to An Arrangement
Now the process of recording these randomized follow actions is quite simple. Even though we've created these variations in session view, we can record the resulting randomness to the arrangement easily by creating a new audio track and setting that track's input to the track containing our edited clips and follow actions. Now, all we need to do is arm the track and record the playback until we've got a nice palette of sounds to edit with; just as we did previously in our first method in this lesson.

And just as we did in the previous method, we are now tasked with listening back through this semi randomly-generated content and playing the role of selector - picking and choosing our favorite elements and sounds to work with. Again, since the generated content has been developed from a common base element, you may find it surprising how many of these generated sounds work together cohesively, even when the individual edits are far removed from their unedited original version.
Method 3: MIDI Fills
Up until this point, we've been working with audio as our starting point for generating these fills and glitches. Our third method relies on MIDI data to generate an endless stream of randomized drums to work with. Working with MIDI instead of audio not only provides us with a different set of tools to generate from; we're also able to edit our generated MIDI easily so that those 'almost cool' generated moments can be refined further and fixed up into more usable elements.
Generating with Drum Rack
We'll start out with an instance of Live's Drum Rack. Drum Rack has a couple of features that we can leverage to do a lot of the heavy lifting for us, just like in our previous methods. The common theme throughout this lesson is that with a strong grasp of Live's tools and devices, we're able to quickly create lots of content to work with without ever having to painstakingly write notes by hand or play complicated parts on our instruments.
Next, let's populate our Drum Rack with a few samples. 6 to 8 samples placed in the bottom two rows of Drum Rack's pads work well for this. For reasons that will soon be clear, it's important to leave a few of the pads empty. For our example, we stuck to percussive elements like shakers, claves, and hats to add a bit of rhythmic spice to our existing drums and pads without overpowering or competing with core elements like the kick and snare.

Animating Drum Rack with Arpeggiator
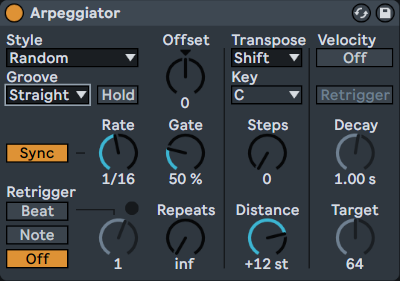
Our next step is to drop in an instance of Arpeggiator before our Drum Rack. Arpeggiator will take a chord from a MIDI clip and repeatedly trigger MIDI notes from the chord in predetermined patterns, styles, and timings. Despite being basic looking, Arpeggiator is a feature-rich little device that is capable of a number of cool tricks if we think outside the box with its application. For this exercise, let's set our Arpeggiator up to play in a 16th note rate with the style set to Random.
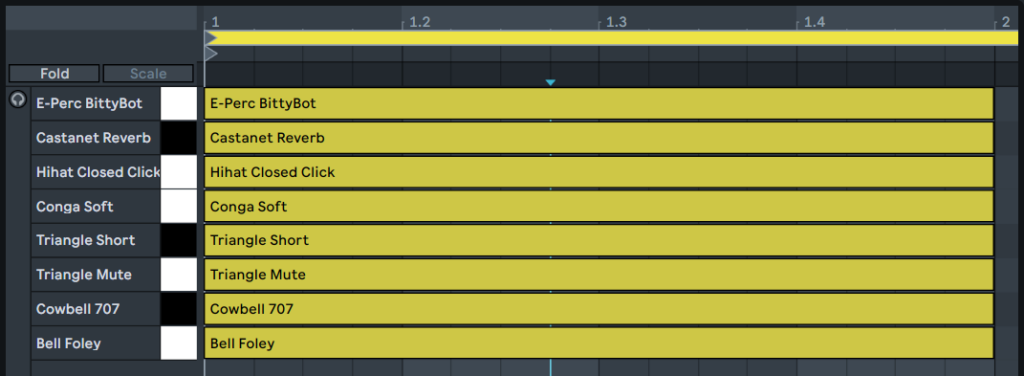
If we create a new MIDI clip in this channel, we can see that our task is simplified because Drum Rack has automatically renamed the piano roll's notes to reflect the names of the samples occupying its slots. All we have to do is populate the piano roll with notes to get Arpeggiator to trigger the notes in a random pattern when played back.
So now we have an arpeggiator that's blurting out an endless stream of sixteenth notes. We can look at the drum rack during playback and see that Arpeggiator is repeatedly triggering the slots populated with drum samples.
Add Complexity and Feel with Velocity
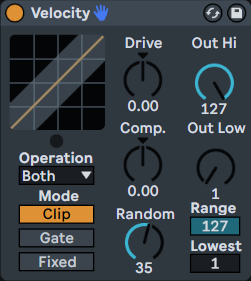
While we're certainly playing random notes, the sound feels a bit bland because there is no nuance or feel to the rhythm. Each hit is exactly the same velocity and sounds stiff and robotic as a result. Luckily, we have another fantastic proprietary Ableton device that is perfect for this exact issue. The next element we're going to add is a MIDI device called Velocity. Grab Velocity from the browser and drop it in the channel in between our Arpeggiator and Drum Rack.
Like Arpeggiator, Velocity is a deceptively simple-looking device that packs a lot of practical applications. For this lesson, we're just going to scratch the surface of what it can do. But if you'd like to learn more about the awesome stuff you can do with Velocity, we have a whole video on the topic!
Powerful or not, Velocity is super simple to use. All we need to do in this case is turn up the Random knob to create some variation in the velocity. With a single knob turn, we can add a lot of interesting feel and complexity to our generated drums by making the individual drum hits more differentiated.
Creating Breathing Room with Random
Our MIDI-generated drums are definitely taking shape by this point. But there is still the matter of the non-stop relentless 16th notes. Real drummers create real grooves and rhythms by also playing with the negative space between the hits. Nonstop 16th notes without some breathing room between them is another nagging characteristic that makes our drums sound quite stiff and robotic.
Random is yet another proprietary Ableton Live device that is a perfect fit to help us tackle this particular problem. We can use Random to occasionally trigger unused slots in our drum rack and create some negative space in our drums. Just drop in an instance of Random after Velocity and turn up the Chance setting to increase the number of times a blank cell is triggered. That's all there is to it! Now we get a look at the big picture of these devices working in tandem.

Also, this method works great when we add in any of our effects racks that we made back in our first method of this video. When we start to combine all of these workflows together, it's easy to create massive amounts of content to edit and compose with. Reusing hits, sounds, and effect racks throughout this process helps to create a cohesive, glued-together sound because of the commonalities that we're working with throughout the whole composition.
Thanks for stopping in to learn with us today! Don't forget to follow the Seed to Stage YouTube channel for more content like this lesson. If you'd really like to take a deep dive into learning the music production process using Ableton Live, consider joining the Seed to Stage Ableton Academy by taking one of our 4 in-depth courses covering Songwriting, Sound Design and Synthesis, Mixing and Mastering, and Live Performance and Live Looping with Ableton Live. Still not convinced? How about another massive lesson like this one in our Free Workshop?