Since the release of Ableton Live 12, there has been a flood of new video tutorials discussing Ableton's new Roar device which comes packaged with the Suite edition of Ableton Live 12. So what could we possibly have to say about Roar that hasn't already been covered? Well, Ableton has offered us an amazingly insightful chat with their developers. These talks about Roar were illuminating, to say the least. In a sea of plugins repeating the same features, Roar truly represents new frontiers and opportunities in sound design. But to capitalize on all the unique things that Roar is capable of, we need to understand where those fresh opportunities are and how to take advantage of them. Many of the Roar settings used in this video lesson can be downloaded as Roar presets on the Seed to Stage Gumroad.
What is Roar?
Okay, so first of all, we do not intend to put other creators and YouTube channels on blast. However, there has been a great deal of discussion around Roar that seems to completely miss out on the unique features and capabilities of the device and what makes Roar truly special. Many tutorials seem to categorize Roar as a simple distortion or saturation device, but this description only begins to scratch the surface of what is possible with Roar.
Ableton describes Roar as a "saturation and coloration device". But even this open-ended description leaves so much unsaid. In reality, Roar can also be a compressor, an EQ, an envelope follower, a unique sounding delay, a randomizer, a filter bank, a wave shaper, a bit reducer, a sample rate reducer, a source of uncertainty, a noise generator, a band splitter, and so much more. Above all else, the main theme of Roar's design centers around a changing, swirling modulation of parameters to create movement in music where it simply hasn't been possible before.
In the example in the featured video's intro, each of these Roar instances utilizes Roar's modulation system to create unique and nuanced tonal changes. In one example, Roar uses its envelope follower to change different parameters inside the Matrix. In the second example, an operator patch with some added harmonics uses Roar's noise modulation source in conjunction with its unique 'Wander' mode. In the intro's third example, a very basic sound made with Ableton's Collision is modulated using Roar's comb filter to create a unique-sounding chorus effect.
Roar can truly be a game-changing effect when we start modulating parameters that have traditionally remained static settings. Not only is Roar a versatile and powerful effect, but it also fosters a great deal of creative nuance in the craft of modern sound design thanks to these powerful new ways of manipulating sounds.
Drive, Tone, and Non-Linear Audio Effects
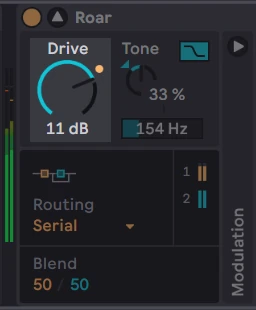
In our talks, Ableton's developers explained that using a nonlinear effect like Roar can be challenging because a single preset will do vastly different things depending on the input signal. This is what 'nonlinear' means - Roar will affect audio in drastically different ways depending on the gain level at the device's input. We can control the input gain using the Drive knob found on the left edge of the device.
Be sure to also take note of the small indicator LED that can be found next to the Drive knob. This indicator LED lights up when the input signal is sufficiently loud to trigger the effect. When using Roar, if you're not seeing this Drive LED light up, the signal needs additional gain to adequately drive the effect.
Similarly, the Tone knob adjusts the balance of the low vs. high frequencies that are being boosted or attenuated before being processed by Roar. As the tone knob is lowered, Roar will be favoring the lower frequencies of the signal at the distortion stage. As the tone control is lowered, the tone is going to get darker as Roar is going to feed the Distortion into those lower frequencies. This causes the Distortion to react to the low end of the input signal more. The slider found below the Tone knob defines a low shelf for what part of the spectrum is being changed by the effect.
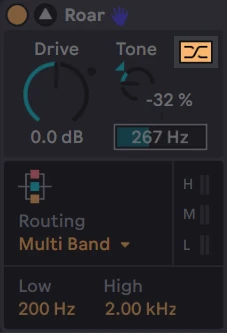
Another awesome feature available at the input stage is a toggle for color compensation, which is found next to the Tone control. Essentially, whatever EQ curve that the Tone control is doing, the Color Compensation will apply the opposite EQ curve on the output, in an attempt to compensate for the changes you've made with the Tone setting.
Yet another powerful Roar feature is it's versatile feedback routing. Roar's three separate feedback engines can be organized in several different configurations to handle feedback routing in a variety of very different sounding ways - not unlike the different algorithms available in Ableton's Operator and other FM synthesizers. These different engine configurations can operate in serial, parallel and multiband
Using all of these Input controls in tandem acts as a sort of preamp for the signal entering Roar, which gives us a great deal of control over what is being changed by Roar and the degree of change that is going to occur. Take note that as we increase Drive at the input stage, we can also compensate for the added volume using the device's Output knob found on the right edge of the device.
Wet/Dry Control and Output Compensation
Below the Output knob is the Dry/Wet Control, found at the lower-right corner of the device. This control is a powerful key feature that gives Roar even more versatility. Since Roar's output can be carefully blended with the original 'clean' signal, this gives us even more finite control over the effect's role in a signal chain. In the early days of Roar's release, we've noticed a lot of folks out there are simply leaving Dry/Wet parked at 100%, and are missing out on the ability to gently layer in Roar with other effects. Sometimes what the finished sound calls for is subtlety, and Roar is more than capable of delivering a lighter touch as well, even with a patch that may sound harsh when we listen at 100% Wet.
Roar vs. Traditional Distortion and Saturation.
At its core, the 'main' feature of Roar is its three saturation stages and wide array of different shaper types. Roar works by taking an incoming audio signal and modifying it in a nonlinear way. We can control how much of an engine's distortion we're hearing using the Amount control. If an engine's Amount is set to 0%, we're not going to hear any of the distortion. And if Amount is set to 100%, the output going to be nothing but distortion. As the Amount is increased more of the saturation curve is applied and the signal becomes more compressed and distorted. And we can control the character of that distortion with this Distortion knob.
At the input stage, the Drive knob controls how much gain is going into Roar's distortion stage. The Drive knob works in tandem with the Amount parameter to define the character of the distortion because of the non-linear nature of Roar. The higher we go, the more of a clipped and distorted sound we're going to be getting. The lower we go, the more of a rounded, softer sound we're going to be getting. So this, combined with the amount and the Drive control, is how we're going to shape the fundamental distortion characteristics of Roar. So again, we have a lot of control over just these three parameters.
Roar's Distortion Modes
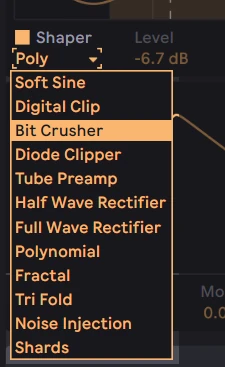
Okay, now let's take a listen to the different distortion modes. So we can see that we have Tube Preamp, Clipping, Downward Tube, and then Soft Clip. So Tube Preamp is going to be a little bit more of a soft, saturated kind of sound. Clipping is going to be a little bit more aggressive and downward tube is going to have a little bit more of a gritty sort of sound. And then Soft Clip is going to be a little bit more more rounded, and little bit more saturated. Clipping is a little bit more aggressive, a little bit more distorted. All of these different saturation types have inately different sonic qualities and you can have a lot of fun at play just experimenting with the different changes these different saturation types will add to your sounds.
Just by changing the type of distortion, we're getting vastly different kinds of characteristics. And this is what's so powerful about Roar, is that it's not just one type of distortion. We have four different flavors of distortion that we can use. And the fact that we can change it with modulation makes it just nuts.
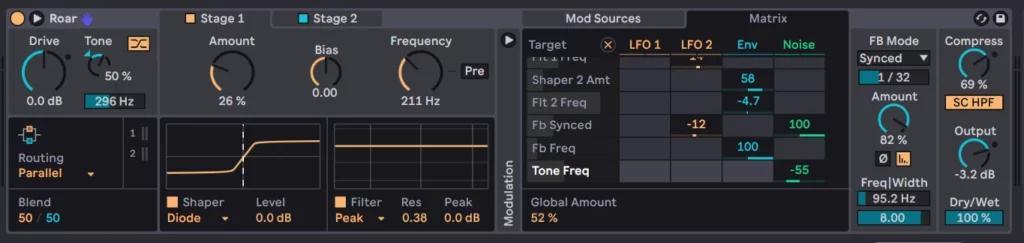
Roar Modulation Matrix
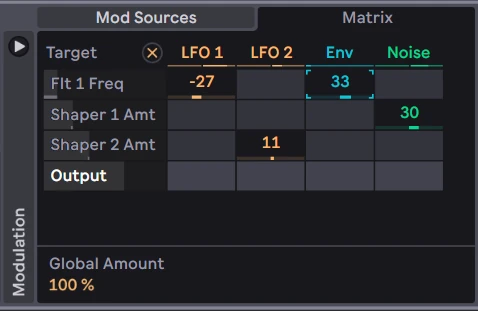
Another source of Roar's versatility is its powerful modulation matrix, which we can access by clicking on the matrix button in the modulation section. And what we can do here is we can assign various modulation sources to different parameters within Roar. This may look overwhelming at first glance, but thanks to Roar's phenomenal UI, it's a breeze to wire up complex and nuanced patches with Roar in a few clicks. Simply click any parameter in Roar and its name will be added to the vertical column of modulation targets on the left edge of the mod matrix. From here we can assign a modulation source by clicking and dragging its cell in the table to define how much the source will affect the parameter. While Roar may look intimidating at first glance, it's clear that the development team at Ableton has taken a great deal of care to build an intuitive interface that streamlines and clarifies an extremely deep device capable of next-level sounds.
So as you can see, Roar is an extremely powerful distortion device that is capable of so much more than what we're used to from traditional distortion plugins. The fact that we can modulate almost every parameter within Roar takes the device it to a completely different level of sonic versatility. Roar's flexibility and versatility make the device capable of adding so much character and nuance to your polished sound regardless of what instrument you pair it with. So I hope you found this video and blog post helpful, and we'll see you in the next one!
Continue Learning with Seed to Stage
If you'd like to learn even more about Roar and sound design, we've been meticulously updating our flagship class "Sound Design and Synthesis with Ableton Live" to encompass all the new cutting-edge features and devices of Ableton Live 12. These updates include more than 2 hours of exclusive content covering every tiny detail of Roar and over 27 hours of content covering the ins and outs of every single proprietary audio effect and instrument in Ableton Live. Get access to our incredible private Discord, exclusive discounts on Ableton Live and more!