Introduction
In today's lesson, we're discussing the core fundamentals for creating a great guitar tone in a variety of styles using only Live's proprietary devices. While in this day in age, there are a huge number of premium options for great guitar tones in Live, this method shows that it's possible to work around the need for an expensive pedalboard or buying into a potentially costly or high latency third-party VST. This method shows that awesome guitar tones can be achieved simply by plugging an instrument cable directly into an audio interface and utilizing audio effects packaged with the Suite Edition of Ableton Live.
All of the racks that are discussed in this lesson are available to download from Gumroad.
Before getting started, let's first listen to the clean tone produced by plugging directly into the audio interface. On most audio interfaces, there is usually a switch that will toggle between a line-level input and an instrument-level input. The purpose of this is to change the impedance when plugging in an instrument, in order to create a workable baseline volume level. Each interface may use a different wordage for naming this switch. Just be sure that the setting being used allows for a clean, clear signal. Take a moment and be sure that the same is true of any related gain knob on the interface as well. The sound should be clean and clear, without clipping as it comes into Live.
The Ableton-Only Guitar Rig
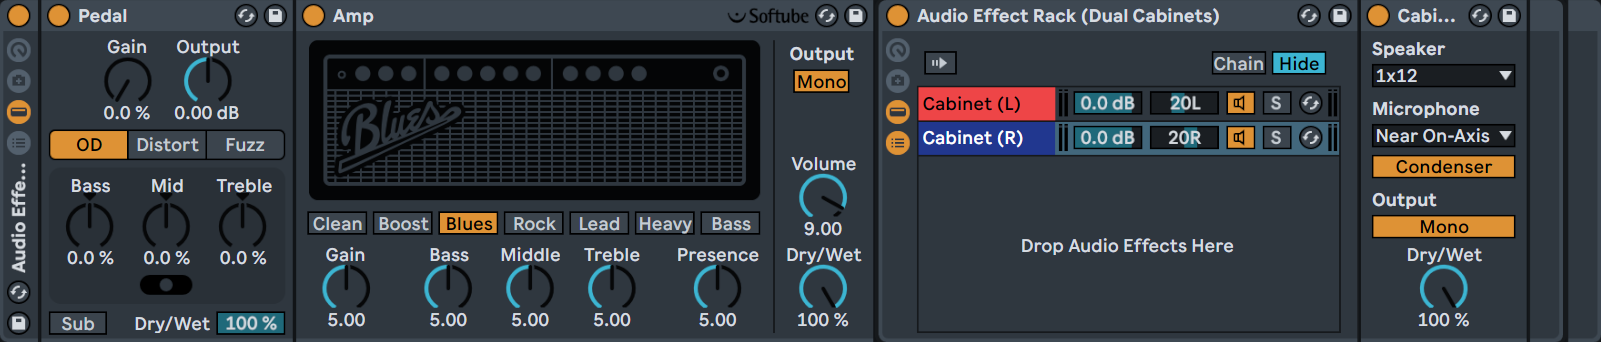
The important takeaway from this lesson is that there are 3 key Ableton Live devices that work in tandem to produce a well-rounded tone with proper gain staging. These three proprietary devices are Pedal, Amp, and Cabinet - all packaged with the Suite edition of Live.
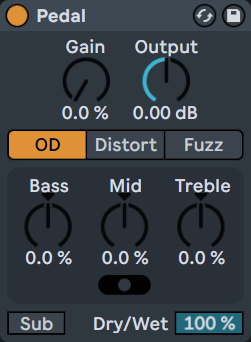
Pedal is used to feed the proper amount of gain into the Amp to be processed, which includes some simplified EQ functionality and a light tone shaper. Pedal grants additional finite control over the signal being input into Amp.

Amp processes the guitar signal through an amp model to produce the core tone of the guitar's sound. There are a collection of different amplifier models which further refine the character of the guitar tone and the distortion of its signal.
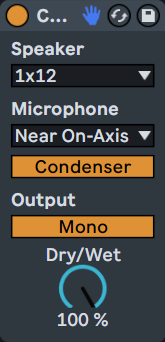
Cabinet emulates not only different speaker types but also different microphone placements in relation to these different speaker simulations to create a more natural sound in a more convincing space.
To further accentuate this ability of Cabinet, two instances can be racked together in an Effect Rack so that a natural-sounding stereo image can be created from one signal.
The Importance of Gain Staging
When loading up a fresh instance of Amp in Ableton, it's easy to initially be left wondering why on earth would anybody use this setup if the gain has not been already dialed in. A big part of what needs to be carefully addressed with any guitar tone is gain staging. Getting a great guitar tone here is an exercise in sending the proper amount of signal gain at each stage of the signal chain so that the incoming signal is processed as intended by each effect. A key concept in this method is that all three of these effects in the signal chain rely on each other to achieve a good guitar tone.
Sending a 'clean' signal directly into Amp will likely result in a thin, bland sound. It is only when a certain amount of signal gain is pushed through the Amp that the signal can be heard as intended. This is why Pedal is such an important device to start with. Pedal can help ensure that the original signal is entering Amp with an appropriate amount of gain applied. Further, Pedal offers some EQ and tone shaping options to modify the incoming signal further, before it gets to Amp. Pedal's title bar can also be right-clicked to enable Hi-Quality mode, which oversamples the signal at the cost of a little CPU. But if you don't have Pedal and Ableton Suite, you can use Utility, Overdrive, or Saturator in its place.
Amp uses physical modeling tech to emulate different amplifier tones and gives a consistent set of controls to distort and modify the signal using gain and EQ across the different amplifier types. The level of signal gain that enters Amp determines the distortion that Amp applies to the signal. Signal below a certain threshold will not 'break apart' with distortion as intended - either not achieving a volume level that will distort the signal, or sending too much gain and over-distorting the signal and ruining the dynamics of the sound.
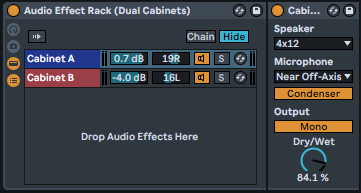
Just as the amount of gain entering Amp is important so that the desired tone can be achieved; gain is also staged and regulated at Amp's output to properly regulate the signal entering Cabinet. In a sense, Cabinet can be thought of as a signal filter for the guitar designed to emulate the sound of different speaker cabinets and Microphone placement combinations. In a live setting, guitars are often mixed and performed live using multiple cabinets, not just to create a bigger, louder sound; but to add a bit of stereo interest to the signal, giving it a more natural, expansive sound.
For this reason, it's a great idea to convert Cabinet into its own rack (Ctrl/Cmd + G) and create a second instance in its own signal chain. This way, the two instances can receive a specified amount of gain, panned separately, and changed to be slightly different tonally. This is done in order to create a more nuanced tone with stereo interest. There is still a huge impact that can be made on the finalized sound at the Cabinet stage because of the massive difference that can be made by experimenting with various cabinet/microphone combos, placement in the mix with panning, and the volume levels of each chain.
Compression and Additional Effects
Understanding the compressor as a pedal effect is absolutely different than using a compressor to smooth out the dynamics of the signal's volume. Using some pretty extreme settings to get almost limiter circuit-like settings that have a really slow attack. What this allows is the 'spanky' transient to get through the compressor before the compressor is able to compensate the signal - really accentuating the slappy attack element of a guitar's sound - especially with single coil pickups.
Many of Live's effects can be used in the same way that they would on a real-life pedalboard. But just as on a real pedalboard, it's important to take into consideration where an effect lies in the signal chain. Reverbs, delays, chorus, distortion and so many other audio effects that can be bought as a guitar pedal and added to a pedal board can be used in the same manner digitally in Ableton. The included preset racks in this lesson demonstrate a number of creative ways that Live's proprietary devices can be used to achieve these different tones. Just remember - it's so important to think about
how one effect is affecting the next effect in the chain each step of the way. A great guitar tone is often the result of the sum of several carefully dialed-in parts.
Thanks for stopping by to learn with us today! If you found this lesson in sound design helpful, consider checking out the Seed to Stage course for Sound Design and Synthesis! The course is always growing with new content and currently sits at over 20 hours of lessons covering all of Ableton Live's proprietary instruments and effects, sound design workflows, and core knowledge about audio synthesis. If you're looking to level up as a sound designer in Ableton Live, look no further than our Sound Design and Synthesis with Ableton Live course!