Pitch Correction Without the Expensive Price Tag
When new producers are confronted with an issue related to pitch correction, often the immediate thought is that the answer needs to come in the form of a premium pitch correcting software like auto-tune or Melodyne. Whether pitch problems immerge from your vocal tracks, guitar tracks or maybe even more niche applications - expensive software is not necessary in most cases! Many issues with pitch can be solved simply using Live's Tuner and our own ears.
An added benefit to working this way is that Ableton gives a lot of extra options when it comes to how audio can be stretched and manipulated the audio to avoid audio artifacts - weird, robotic pitch effects that are often the consequence of using auto-tune software. Often enough, it's easy to detect when someone is using autotune because without care and consideration for each edit, artifacts and unintended noises are left behind. These edits can be a bit harder to detect when a producer uses auto-tune correctly. In this video, we intentionally start out with a really bad vocal recording to correct using Ableton's proprietary devices in order to demonstrate that expensive plugins aren't necessary when fixing pitch issues.
The Workflow
Start by grabbing an instance of Tuner and drop it on the track to be corrected and then while the track is playing you can watch where the pitch problems occur during playback. In the example in our video, the sample is often a little out of pitch, in the neighborhood of 20 to 30 cents sharp. In short, we want to correct the audio note-by-note if necessary by slicing a larger clip into smaller pieces which are tuned using the clip-level pitch controls.
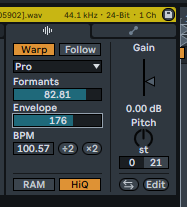
When an audio clip is selected, the clip's controls for both warping and pitch correction can be found to the left of the waveform of the sample. Using these controls in conjunction with Ableton's Tuner allows us to have very fine control over the pitch of individual notes. The cents control below the pitch knob allows control down to 1% of the difference between semitones, meaning 50 cents can be applied to sharped or flatten a note to get to the nearest semitone - a great deal of finite control over a very small amount of time if we choose to edit that way. This is the core task that is being automated for the producer using a premium pitch correction solution.
The Tuner provides feedback as to how much a given note needs to be tweaked to be perfectly in pitch. However, it's still important that your ear is doing its job too. Listen to these edits in context with other instruments playing to double-check your edits and make sure that they sound correct. Generally speaking, it's good to remember that your ear is usually more important feedback than some number on a display.
Finally, differentiation between edits can happen with each individual note. In the arrangement view, simply select the clip at the point that you intend to edit and use ctrl/cmd + E to create a new breakpoint in the larger sample. Select the endpoint of the intended edit next and use ctrl/cmd + E again to create a second breakpoint and isolate the segment of audio to be edited. Doing this seemingly extra step and working one 'cut' edit ahead will ensure that the remaining audio beyond a given edit doesn't retain the changes made in the previous edit.
Warping Mode Selection is Important
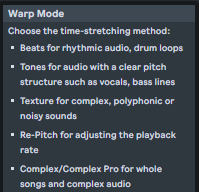
By default, Ableton's warping mode is set to 'Beats', which prioritizes the preservation of a sample's transients. This works great for drums and percussive sounds, but if what you're correcting is a longer, sustained note, such as a voice or stringed instrument, this will very often result in artifacts appearing when a sample is corrected. Let us not forget that when we're shifting the pitch down, we're elongating the amount of time that the sample takes. When we make a sample sharper, we're shortening the amount of time that sound occupies.
For pitch correction, it is important to select a warping mode that preserves not just the transient, but the sustained part of the sound as well. Ableton provides more suitable warping modes for this purpose, the most relevant of these being 'Tones'. Don't be afraid to experiment with these warping algorithms, others may work well for either avoiding popping and crackling artifacts or for adding a bit of intended digital sonic seasoning to your edits. Often enough, Complex or Complex Pro warping modes do a great job, at the cost of some additional CPU overhead.
Remember, check your edits against the full mix to get a good idea of the big picture. Sometimes, the tuner will claim that you're perfectly in pitch, but it doesn't sound quite right in the mix. Let your ear have the final say!