Why You Need a MIDI Controller
A MIDI controller is an integral part of our Ableton Live setups, especially when it comes to live performance. MIDI controllers allow us to have a much greater degree of hands-on control over our music, whether that is in a composition or performance setting. A MIDI controller gives us a greater amount of instantaneous control over practically any parameter in Live, MIDI instruments, and audio effects. When we spend a little time setting up our MIDI controllers properly, we're also able to compose music in a faster, more intuitive, improvisational way - putting the tools and functions we actually use at our fingertips and enabling us to spend time taking our eyes off the screen. Engaging with music production and performance via a properly configured MIDI controller feels very freeing compared to fumbling around with the keyboard and mouse. In today's lesson, we'll be focusing on the basics of how to set up your MIDI controller and how to get Ableton Live to properly recognize it.
MIDI Input: Track vs. Remote Input
Despite being (supposedly) plug-and-play devices, one of the most commonly asked questions at Seed to Stage is 'How do I get my new MIDI controller to work properly in Live?'. In this lesson, we will demonstrate some of the core fundamentals that will be important when setting up any MIDI controller.
Most modern controllers will connect directly to your computer via USB cable. There are a few common types of USB connections these days; the most common being USB-A, Micro USB and USB C. Unless you've bought your MIDI controller used, the best method is to just use the cable that came packaged with the controller. But if you're using an aftermarket cable for whatever reason, make sure you're using the right type for your device! Many devices will light up in some way to show they're receiving power once they're plugged in.
So now we have our MIDI controller plugged in, Ableton is running, and...nothing! You may have gotten stuck at this stage, where you can see that you have a track armed in Ableton and the track should be ready to receive information from the controller. But unfortunately for some reason playing the keyboard doesn't appear to do anything. So how do we overcome this problem? Thankfully, it's just as simple as going into Ableton's preferences menu (Options > Preferences) and clicking the tab for "Link, Tempo, MIDI" on the right-hand side of the Preferences menu.
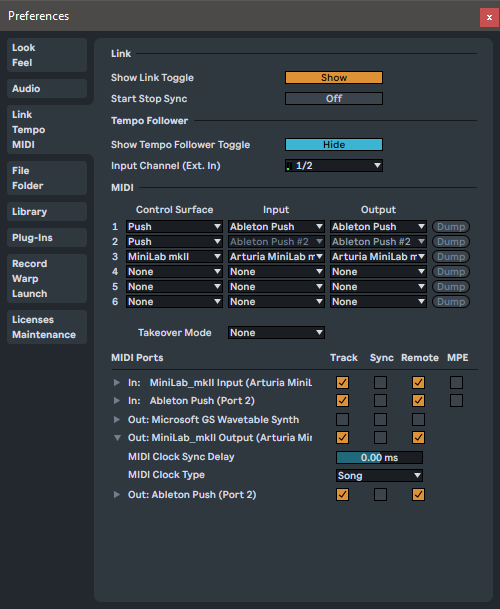
You may see on this screen that Ableton has recognized your device in the top section of the menu for "Control Surfaces". However, what we want is in the section below this for MIDI Ports. Specifically, we're looking for our controller's Input port. The channel we're looking for will be called "In: <Your Controller Name>", and we want to make sure that the checkbox is enabled under "Track". This setting allows MIDI data to be fed into any armed MIDI track, meaning that the controller is capable of playing MIDI-based instruments inside of Ableton. The same input also has a checkbox for "Remote", which allows us to map the controls on our MIDI controller to control different parameters of Ableton itself - such as Tempo controls, Play/Stop, or bringing a specific device into focus.
These two different functions - playing instruments and mapping parameters are separated in the device in order to allow more flexibility in larger, more complicated setups so that different devices may be used to perform different roles without stepping on each other's toes. If you have a single MIDI device that includes pads, knobs, or switches and you'd like to play as an instrument and control parameters within Ableton Live, you should check both the Track and Remote boxes in the device's MIDI input port. Once this is done, we should be able to play MIDI into an armed instrument to hear output AND be able to map the sliders, knobs, and touch pads of our device using MIDI mapping.
Armed Tracks and MIDI Instruments
Now that Track control for the MIDI controller's input is enabled, channels with MIDI instruments are able to receive MIDI signals from your controller's keyboard provided they are armed. To arm a track, simply click the Arm Recording Button on the channel, which will turn red when it is active. As long as it's a MIDI track, the MIDI controller's keyboard should be able to play the instrument included in the channel. Playing the keyboard yourself rather than writing everything to clips using the piano roll with your mouse is a much more engaging and fun way of working; and tends to give your finished product more of a natural feel when you're not locked into the grid. Even if you're not a trained keyboardist, working directly like this is a great way to explore and generate new ideas for your music.
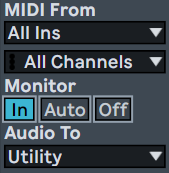
Another method for using your controller to play on a given track is to turn the monitor section of the track from Auto to "In". Using the monitor's In setting means that the channel will always receive input, even if the arm recording button is not engaged. This setting can be useful when the intention is to always have a specific device pointed to a given track, whether it is a MIDI controller or an audio device like a microphone on an audio channel. In more complex setups, it is possible to provide even more specificity by selecting a specific device to send MIDI to the channel by switching the "MIDI From" dropdown from "All Ins" to a specific device.
MIDI Mapping
In the preferences, when we enable "Remote" on a MIDI controller's input, were able to map the hardware controls included on the controller to a huge number of controls within Live and any included 3rd party instruments and VSTs. Spending some time in MIDI mapping can make any live set feel a lot more intuitive to navigate and control. There is an incredible amount of customization and personalization we can perform with MIDI mapping to put the meaningful controls for our set exactly where we want them. This is absolutely integral in Live Performance when putting the important controls into intuitive places can make a complex performance repeatable and easy to navigate.
The basics of MIDI mapping are very simple and straightforward. We simply click the MIDI button in the upper right of Live's Interface and every mappable parameter will turn blue. Just click one of the many mappable parameters to highlight it and then touch the hardware knob, slider, pad, or note on your keyboard you'd like to associate that control with. Controls that have been mapped will appear in the Midi Mappings panel that replaces the browser while the MIDI map mode is active. We can view and edit our mappings from this window.
Control Scripts and Surfaces
A feature included with many modern controllers available today is integrated MIDI Control Scripts. Control scripts automatically map proprietary functionality inside of Ableton to the MIDI controller in predetermined ways, and sometimes even perform functions that aren't mappable by normal means, such as scrolling through Live's tracks and channels with a knob, navigating the browser or providing visual feedback on the controller itself.
In the preferences menu, under the same tab as before, check to see if your device has it's own specified Control Surface via the Control Surface dropdown menu. If your device has a Control Surface associated with it, it will be selectable in this dropdown. Detailed instructions for how to use a specific device's control surface inside of Live can be found either in Live's Help view under "Control Surface Reference" or by consulting the controller's manual or website.
If your controller doesn't have an associated control script, it's not the end of the world either - MIDI devices adhere to a standard and your controller should still be able to perform all kinds of mappings; it just hasn't been preconfigured to do anything in particular with Ableton Live specifically. Lacking a control script is fairly common in off-brand or cheaper MIDI controllers, and it doesn't stop them from being the right choice in lots of use cases and budgets. That said, if you're currently shopping around for a MIDI controller; looking for one that has a well-integrated control script for Ableton Live is a good feature to keep an eye out for.
In our video example using the Novation LaunchKey, our control script allows us to start and stop tracks independently, navigate our different tracks with a knob, play different scenes, and get some visual feedback on the controller using different colored lights on our pads.
The Blue Hand
Now that we're using our controller to operate inside of Live, there is an additional element of Live's interface to watch out for. Whenever an instrument, effect, or rack inside of our set is being controlled by a device outside of Ableton, it will display a blue hand in the title bar of the device that is being controlled. Further, your view will update automatically to show the blue hand on the most recent device that has been tweaked or had a parameter changed.
Thanks for stopping in to learn with us! While it's easy to explain the fundamentals of controller setup and MIDI mapping in a quick tutorial, the advanced control that we're capable of achieving using this feature goes very deep and has a huge amount of more niche and advanced applications that we go over in extreme detail in our Live Performance and Live Looping course. If you'd like to take a deeper dive into the awesome things you can do with MIDI mapping, such as live looping, building out advanced drum racks and more, check it out!