Want to learn how to craft deep, powerful sub-bass tones in Ableton Live that translate well across different speaker systems? This tutorial breaks down how to create a rich, powerful sub-bass that you can easily hear in the mix. We'll demonstrate this by showing off the inner workings of our "Subs You Can Hear" instrument rack for Ableton Live, which is available on Gumroad. In this lesson, we'll break down the device and go over some sub-bass theory to clarify some misconceptions about this crucial element of modern music.
Sub-Bass is Often Misunderstood
Considering the prevalence of bass in modern electronic music, sub-bass is a term often misunderstood, especially by new producers. What makes things worse: The average bass tutorial on YouTube often misuses this term, leading to more confusion and mixes that don't translate well across different devices and speaker setups.
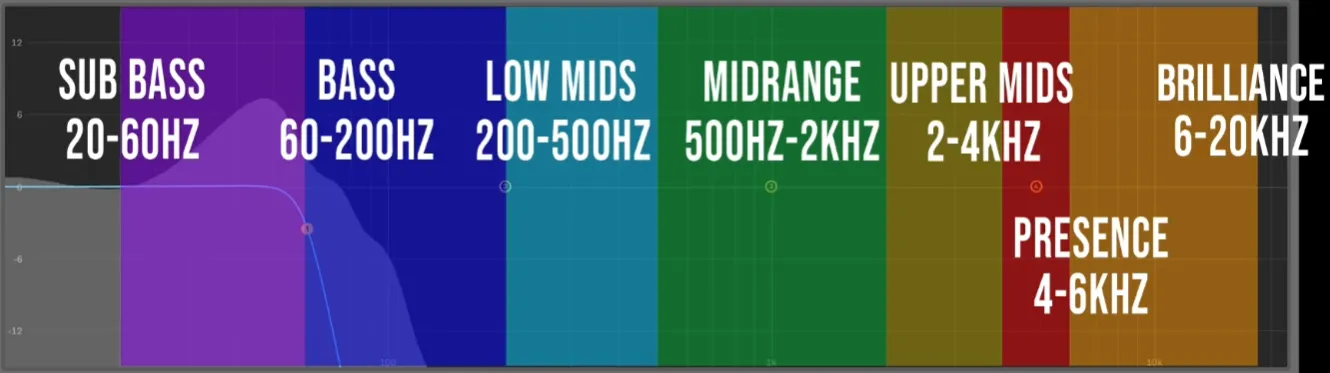
Something important to understand is that bass and sub-bass frequencies occupy two different spaces in the sonic spectrum. It's essential to recognize that we don't exactly "hear" sub-bass; we feel it. Sub-bass comprises frequencies between 20 and 60 hertz, while bass frequencies occupy a space between 60 and 200 hertz.
Not All Speakers are Equal
The number main for poor translation to phones is that their small speakers cannot output low frequencies at significant volumes. Very small speakers simply don't have the power necessary to create audible vibrations at such low frequencies.
Most consumer electronics, even very small ones, are quite capable of reproducing bass frequencies. This means that low-end instruments must generate some frequencies between 60 and 200 hertz to approximate sub-bass tones on phones and small speakers.
Harmonics: The Secret Ingredient
The instrument in our "Subs You Can Hear" rack is Ableton Operator. The sub-bass tone it creates starts with a simple sine wave - as many sub-bass tones do. Here is where we can run into issues if we're not careful - sine waves do not feature much harmonic content on their own. And because of this, their volume can be easily overcompensated to be heard in a full mix. Usually, the answer to hearing a sub-bass sound more clearly is not turning up the volume, but adding definition with additional harmonics.
Harmonics with Ableton Operator
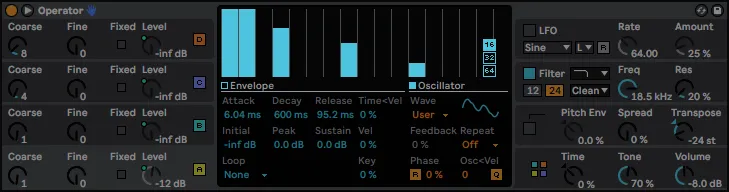
Operator has a great way of displaying information about the harmonic content being produced by the instrument. Each column in the Oscillator viewport represents a single harmonic moving upward in series. Octave harmonics of the root note being played are found at each doubling of the harmonic index. Meaning that the furthest left column is always the root (fundamental) harmonic, with octaves of that note found at the 2nd, 4th, 8th, 16th, 32nd, and 64th columns of Operator's oscillator viewport. If we accentuate these specific harmonics, we're adding harmonic content that is sympathetic to our root note. These sympathetic harmonics are what we're still able to hear representing our sub-bass on speakers which are too small to adequately drive the fundamental harmonics of a sub-bass tone.
For more info about Ableton Operator, check out our Youtube videos or blog posts specifically catered to helping you better understand this incredibly powerful Ableton Live instrument.
"Subs You Can Hear" Device
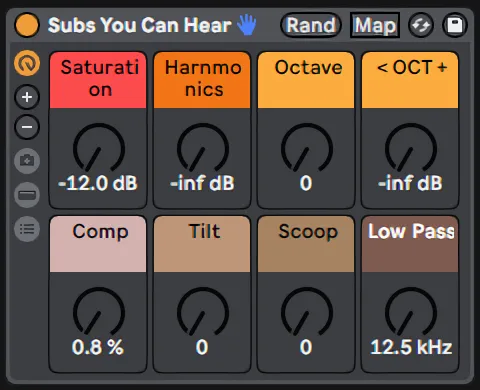
The Subs You Can Hear device is an instrument rack for Ableton Live allows us to add additional harmonics using various methods to tailor the sub-bass to your song. Chances are, you won't need another plugin for creating deep yet translatable sub-bass for your music.
Device Controls
Saturation: adds volume-compensated hard clipping, creating harmonics.
Harmonics: adds additional harmonics from the overtone series.
Scoop: emphasizes lower frequencies in conjunction Low Pass filter to shape the sound.
Octave: adds additional octave harmonics to the sub-bass.
Comp: adds aliasing distortion and changes the tone using saturation.
Tilt: adjusts the balance between sub-bass and higher frequencies.
In summary, focusing on the mid-range is crucial for a mix that translates well across devices. Sub-bass, while important, revolves around a relatively small range of frequencies. If you want your mixes to translate well, it's key to concentrate on the mid-range. Doing so not only helps create definition and clarity in your music but also ensures that the sub-bass elements can be heard through devices too small to create these low frequencies.
Pick up this Ableton Live instrument rack for pay-what-you-want on Gumroad, and stay tuned for more lessons and devices for Ableton Live. Thanks for reading!