Latency is an Often Misunderstood Issue
Let's address a common issue that plagues the entire community of recording artists using Ableton Live. Latency can be a confusing concept that many folks struggle with early on when learning Ableton. However, confusion around some fundamental concepts means that recording with latency is a very common problem faced by producers of all experience levels, not just beginners. Understanding concepts such as the difference between MIDI latency, audio latency and how to better utilize our hardware devices to record audio from an external source can quickly clarify some of this confusion.
Optimized Devices Lessen Latency
In the example in the video above, we're working with a guitar signal chain. To learn how to build these guitar instrument racks, check out our blog post "Getting a Great Guitar Tone with Ableton Proprietary Devices", or grab the finished racks from Gumroad. It's possible to get a great guitar tone using just proprietary Ableton Live, and one of the benefits of doing so is the fantastic job they do saving on overall latency. However, the subject of today's lesson is trying to take things one step further and record without any latency whatsoever.
An important thing to understand is that when we record through an armed track containing plugins and audio devices, we will be recording with some amount of internal latency. As you can guess, this means that during playback the recorded audio will also include the latency that we've committed to audio. This causes the timing that was physically played while recording to differ from the timing and feel of the recorded audio during playback. Ableton Live includes a feature called "driver error compensation" which can help to reduce overall latency, however, this is not the same thing as recording with zero latency.
Be Aware of Monitoring Settings
Let's break down one major way that latency is introduced to audio recordings by looking at the actual difference between recording audio with and without latency. Let's take our desired audio track and duplicate it with control/command + D. On the original track, we're going to leave the monitor switch for the channel set to 'Auto'.
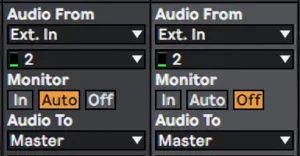
When monitoring is active, a track's input is played through the devices on the channel so that the signal can be processed and then sent to output. It is during this processing stage that audio latency is introduced to the signal.
While there are some zero latency audio devices out there, most of the devices in a signal chain, no matter how well-optimized they are, need a small increment of time to be able to perform their role in processing the audio signal.
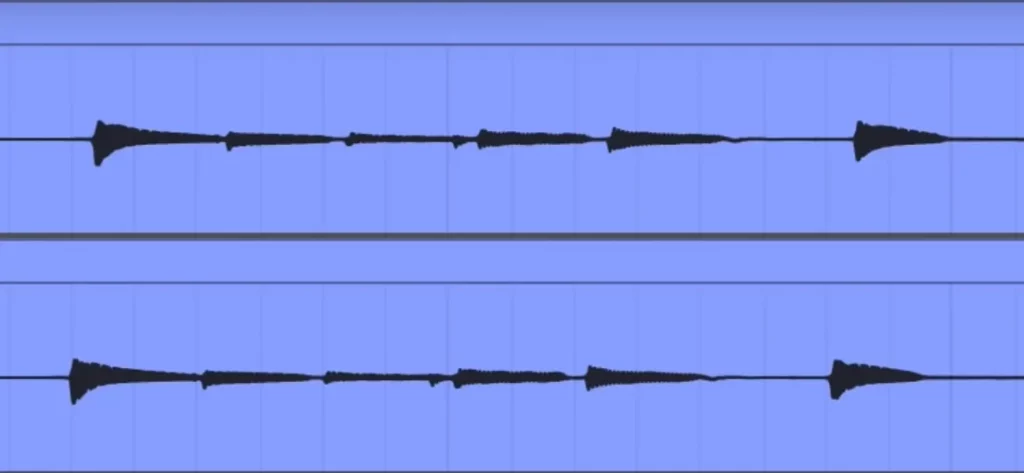
In the screenshot below, we can see the impact that processing has on the signal's latency in the top channel. The channel on the bottom bypassed the processing stage during recording with its monitor set to 'Off'. We can see that the top channel's latency causes the audio to be committed with a slight delay. While this difference in timing may seem minuscule and require us to zoom in closely to see the timeline, that difference is felt during playback.
Audio Track Latency Compensation
Essentially what we're seeing is Ableton committing the latency that is created by the signal chain to the recording. If you're listening to your track with the auto switch on Live will attempt to compensate for the latency that's being created by all of your signal chain. But still - this is not the same as committing no latency to the recording to begin with.
Let's take a look at our preferences. In the tutorial video, we've left Ableton on its default buffer size of 512 samples. Often, musicians who want to record audio into Live will crank this setting down to as low a buffer size as possible in an attempt to reduce latency. At lower buffer sizes like 128 or 64 samples, latency can be reduced considerably at the cost of more CPU processing. However lowering the buffer size will never truly resolve the issue, because monitoring the channel while recording is going to introduce latency regardless. Additionally, on busy sets with lots of devices and channels, these low buffer sizes demanding more CPU resources can also result in glitches and audio dropouts. In reality, our solution lies in changing up our workflow, not in any options menu.
Bypass Audio Latency with Your Audio Interface
So, now we know that setting the monitor to 'Off' while we record will completely sidestep our latency issue. But with the monitor off, we can't hear the channel we're recording. How do we hear the audio that is being recorded by Live in real-time? The answer likely comes from your audio interface - a feature referred to as "Direct Monitoring"
There is a good chance you've seen these words on your audio interface before, even if you're using an entry-level interface. What Direct monitoring means is that the signal of the external instrument is routed into my sound card and directly out to my ears. There is zero latency to this signal pathway whatsoever. So, when you're recording vocals, guitar, or even a mic set up to capture acoustic instruments, the best monitoring solution is simply listening to the direct signal.
Most Modern Interfaces Include Direct Monitoring
In our example video, the interface being used is a UAD Apollo, which includes insert effects, a hardware-level mixer, and all kinds of other bells and whistles. This is a pretty robust sound card, but fear not - practically every audio interface being sold today has some form of direct monitoring included.
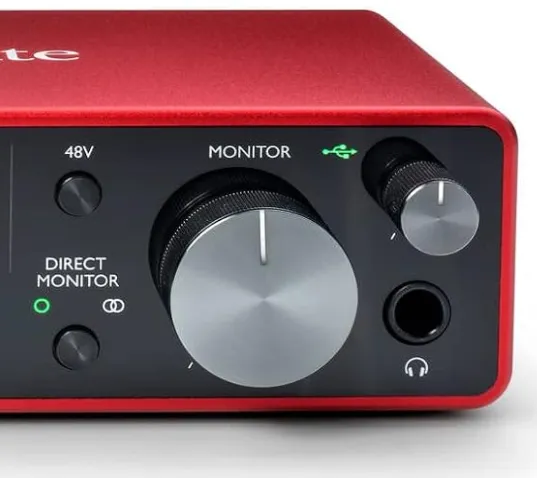
The Focusrite Scarlett is a very common, entry-level audio interface that includes a direct monitoring switch and gain control on the front panel. While this device may lack some of the more sophisticated features of the UAD Apollo, the Focusrite is a very capable piece of hardware in part because of this direct monitoring feature.
Pretty much any audio interface that includes direct monitoring will also include some form of volume or gain control to regulate the output level of the signal being sent to the computer. And proper gain staging truly is the single most important parameter when working this way.
Monitoring MIDI and Audio Channels
In terms of UI, Ableton Live tries to handle any audio and MIDI channel the same way. Developers wanted the interface to look the same for both types of channels, even though monitoring audio and MIDI channels is handled somewhat differently. We can use Direct Monitoring of an external instrument/device to bypass the latency introduced by the signal chain. However, when working with MIDI, the signal chain is also what creates the audio - without monitoring the signal chain of the MIDI channel, there is nothing to hear. So when looking at the monitor settings for an audio and MIDI channel next to each other; their identical appearance may obfuscate the concept that MIDI and audio signals are handled differently. Just remember, audio channel latency can be avoided entirely if we utilize Direct Monitoring, and bypass Ableton's internal monitoring while we record.
A Repeatable Method for Eliminating Latency
It would be great if there were some sort of indicator in Live's UI to remind us of input latency. But once we understand how latency is introduced by our signal chain, it's easy to mitigate latency or work around it entirely with a simple, repeatable process.
Create and arm an audio channel. The monitor should be set to Auto while we design the sound for the channel so we can hear. At this stage, the introduced latency doesn't matter as much since we're not recording.
For recording, duplicate the track and set the monitoring switch to off. While we're recording, use direct monitoring from your audio interface and listen to the signal without Ableton's signal chains or monitoring.
In the case that you don't have the resources on your system to handle a duplicate of your original signal chain; you can always just after you've recorded and you like the take. You can always just copy your signal chain and put it in the track that you recorded without latency.
During playback, set the recording channel's monitor back to Auto - now we can hear the processed signal playing with the exact latency-free timing that we recorded.
Free Preview Lesson: "Latency for Live Musicians"
Want to learn more? Our course Live Performance with Ableton Live contains everything you ever need to know about managing latency. Check out the free preview video "Latency for Live Musicians"